The Pullstruder: A Game-Changer for Filament Production
If you’re a 3D printing enthusiast you’ve probably faced the dilemma of high filament costs and inconsistent quality. Sure, buying filament is easy, but wouldn’t it be great if you could produce your own high-quality filament right at home? That’s where the Pullstruder comes in—an innovative filament production machine designed to let you turn plastic bottles, usually single-use PET water bottles, into the filament fuel for your 3D printing addiction. And let me tell you, it’s a game-changer.

Once you get the machine set up and dialed in, you’ll be amazed at how easy it is to make your own filament. But before you dive in, let’s go over some important tips to ensure you’re getting top-notch results from your new machine.
The Pullstruder: A Game-Changer for Filament Production 1
1. Assembling and Tuning the Pullstruder 1
2. Getting the Right Diameter Consistency 1
1. Assembling and Tuning the Pullstruder
The first step with any new piece of equipment is assembly, and the Pullstruder is no exception. Fortunately, this machine is designed with user-friendliness in mind. It is super easy to find the parts on any open-source 3D printing site. The assembly is straightforward, and the electronics are simple, you’ll have it up and running in no time.
Once you’ve assembled it, the next crucial step is tuning. The Pullstruder comes with adjustable settings that allow you to control the speed and temperature of the extrusion process. Fine-tuning these settings is essential for getting the best quality filament. Tuning is different for each Pullstruder, I would just play with the extruder heat and motor speed separately until you get the diameter size you like, having a caliper is very important for this step.

2. Getting the Right Diameter Consistency
One of the most important things when using the Pullstruder is ensuring your filament comes out with a consistent diameter. Standard 3D printers typically expect filament to be 1.75mm in diameter, so having variability here can cause jams or poor print quality. That is why it is important to tune the temperature and speed of the Pullstruder.
A common cause for the inconsistent diameter is inconsistent Pullstruder feed. And by feed I mean the plastic bottles get heated and fed through the extruder to form the filament. Cutting plastic bottles into ribbons for a Pullstruder is surprisingly simple but a bit of a crafty process. First, grab a clean plastic bottle—anything from a soda bottle to a larger water container works. You’ll want to remove the label and cap, then cut the bottom off the bottle. From there you can carefully cut the bottle in a spiral, working your way up.
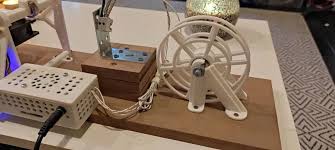
The goal is to create one long, continuous strip that has a consistent width that can then be fed into the Pullstruder. I would highly recommend making a jig that cuts the bottle quicker and more consistently than a pair of scissors. You can find a jig on Thingiverse by searching for a bottle cutter or something along those lines. Or you can use the tool that I use which you can see in the photo below.

3. Easy to Use Once Set Up
Here’s the best part: after you’ve assembled and fine-tuned the Pullstruder, it becomes incredibly easy to use. You plug it in, turn the heat up, feed in your plastic bottle ribbon, and then start the motor. The machine does the hard work of extruding the plastic and spooling it, you just need to monitor it and turn it off when it runs out of feed. That’s It!
Final Thoughts
The Pullstruder offers an excellent solution for anyone who wants to take their 3D printing to the next level by producing their own filament. While the initial setup and tuning may require some time and patience, once everything is dialed in, the process becomes straightforward and efficient. So, if you’re ready to take your 3D printing to new heights, the Pullstruder might just be the tool you’ve been looking for. Happy extruding!
To learn more about the Pullstruder check this out!